
5 Nail Art Designs For Beginners
Doing nail art at home is easy and fun, requiring only a bit of patience, practice, and a creative mind. You can transform your plain manicure with even the simplest of nail art designs. Here are 5 beginner-friendly nail art designs that don't require any fancy tools and will make you fall in love with nail art. Let's check them out!
5 Nail Art Designs for Beginners
1. Heart Nail Art Design

Love is in the air!
With Valentine's Day approaching, what better nail art design to flaunt than cute little hearts? Contrary to what you might think, you don't need a nail stamper or water decals to achieve this look. All you need is a toothpick!
Here's how you can do the heart nail art design with a toothpick:
- Paint your nails with a base color.
- Take a red nail lacquer like French Affair and pour a small amount on foil or plastic.
- Using the pointy side of a toothpick, pick up the nail lacquer and create three dots on your nails close together, forming the shape of a heart. Repeat to create as many hearts as you desire.
- Try out this nail art for your upcoming Valentine's Day date and share your picture on Instagram with the hashtag #DeBelleNails.
We have shared a few more exciting Valentines Day inspired nail art designs which we bet, you are going to fall in love with! Check out 8 Cute & Easy Valentine's Day Nail Art Designs Ideas
2. Half Moon Nail Art Design
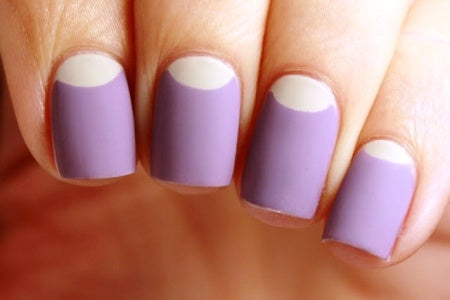
Image Source: AmazingNailArt.Org
The half moon nail art design is a classic and popular choice, often seen on Hollywood celebrities. It only requires two nail lacquer colors, preferably in contrasting shades. You can create endless color combinations with this versatile design.
Here are the steps for the half-moon nail art design:
- Paint all your nails with the lower color of your half-moon design.
- Place paper reinforcements or bindis (of similar size) on the lower part of your nails, creating a half-moon shape.
- Paint the upper section of your nails with the second color.
- Carefully remove the paper reinforcements or bindis without waiting for the second color to dry.
To make the design more stylish, you can add studs or dots on either side for an enhanced look.
3. Quilted Nail Art Design
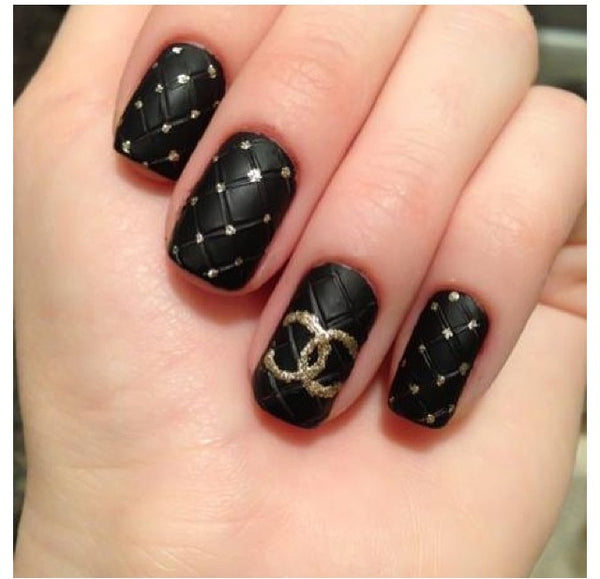
Creating a quilted nail art design may seem challenging, but it's actually quite simple. This textured 3D design can be done using either a dental flosser or nail art striping tape.
Here's how to achieve the quilted nail art design using a dental flosser:
- Apply two to three thick coats of a base nail color.
- When the nail lacquer is semi-dry, use the flosser to make three diagonal indents on the nails, creating a quilted pattern. Apply gentle pressure.
- Ensure the design looks uniform, resembling a quilted blanket.
- To add a 3D effect, you can use silver or golden nail art beads on the connecting points of the indented lines.
4. Newspaper Nail Art Design
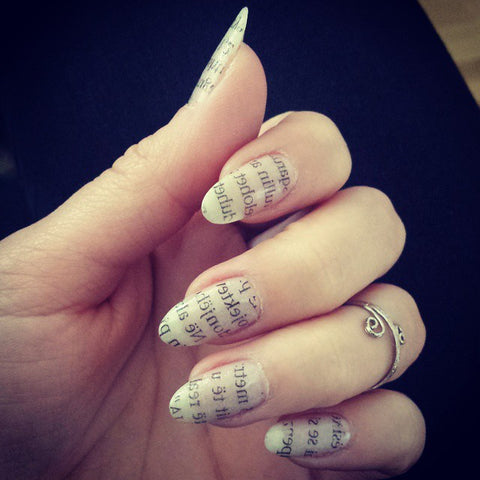
Image Source: DesignTrends
This unique and beginner friendly nail art design requires only three things, a nail lacquer, a newspaper and some liquid mouth wash.
Yeah, we will be using a liquid mouth wash to create a nail art design.. It does sound a little weird, but it works!
Here is a quick step by step tutorial on how to do newspaper nail art design :-
- First, Apply two coats of a light nail lacquer colour as base, something like Natural Blush from our collection would do.
- Wait for it to dry completely.
- While your base is drying, cut off a few small pieces of newspaper with some text on it. Make sure that the pieces are a little bigger than the size of your nails.
- Once the base has dried properly, pour some liquid mouth wash in a container and dip your finger in it for about 30-40 seconds. Do one nail at a time!
- Take out your finger and gently press a piece of newspaper on your nail.
- Keep pressing it for a few seconds until the text from the newspaper has transferred to your nail and then pull it off.
- Use a Q-Tip dipped in water to clean off the excess newspaper pieces that might be stuck on your nail.
And that is it! Your unique nail art design is ready. So effortless yet fun, isn't it? This design would definitely amaze your friends!
Also Read: How To Paint Your Nails Perfectly | Step By Step Guide To A Salon-Like Manicure At Home
5. Glitter Tips Nail Art Design
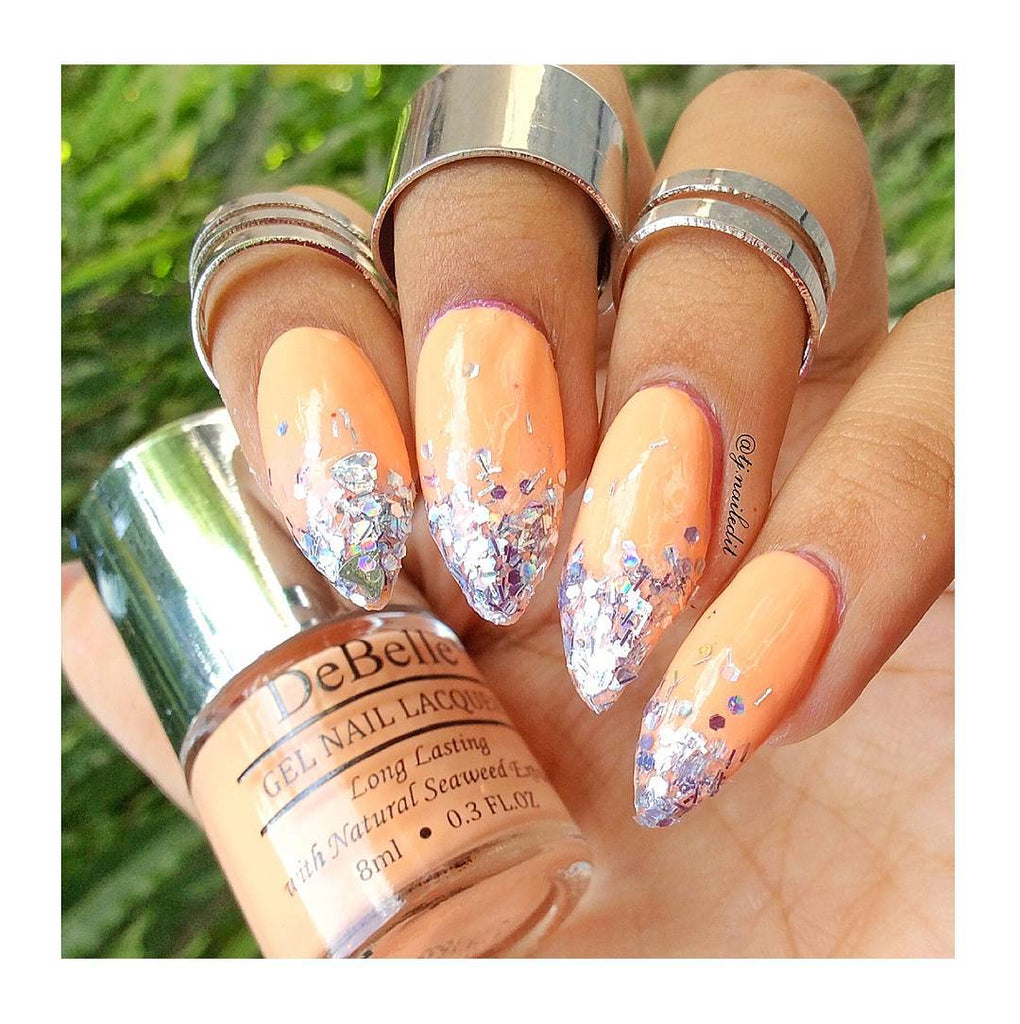
When in doubt, sprinkle some glitter! Nail art designs involving glitter are timeless and versatile, complementing various outfits and making your nails stand out.
You can apply a glitter nail lacquer directly onto your nails, but for a more elevated manicure, try the glitter tips nail art design.
Here are the steps for creating glitter tips nail art design:
- Apply two coats of your chosen base color. For example, use "Peachy Passion" from the gel nail lacquer collection.
- Take a sponge and apply the glitter nail lacquer onto it.
- Dab the sponge gently onto the tips of your nails to create a gradient effect.
- Repeat this process a few times for a more intense gradient effect.
- For added sparkle, you can use nail art glitters available in the market
Which of these nail art designs do you think is the easiest one to do? Let us know and do share this post with your friends who are into nail arts!